Skip to Main Content
MyCampus | About |

Northwood Tech logo
 
          Back to Student Resources

Blackboard Ultra: Faculty Resource: Collaborate


Blackboard Ultra: Faculty Resource

Collaborate

Blackboard Collaborate is a video conference software built directly into Blackboard.  Collaborate allows you to meet with a student "Face to face" even when off-campus.  You can have a class meet at set times or hold virtual office hours.  By default, you will already have a Collaborate session created for your course but you can also set up additional sessions that would allow 3 or 4 students working as a group to meet "Face to face" without traveling.

Collaborate Dashboard


Jump to a section about Collaborate

Create a New Session

1. Go to the Course Content page and click on more options next to the Blackboard Collaborate icon.

2. Click on Manage all sessions which opens a new page.


3. Click on Create Session

Session Details

4. Give the session a name

5. Check box if you want guest access

6. Enter event details

  • Set start and end days/times
    • No end means the session is always open, easy for students to use for talking face to face on their own.
    • You can set a repeating session for regularly scheduled classes or meetings
  • Choose how early students are allowed to join before the start time

Session Settings

7. Select the Settings tab

8. Select the appropriate settings/permissions based on your course needs

  • only presenters can share content

9. Click on Create button

10.  When you're all finished, click on Save.    

11.  Now you will see a list of sessions:

  • default course room and
  • any sessions created

12. Click on more options to edit or delete a session or get a link to share for the session

  • The links can be emailed or posted in blackboard for students to use for joining a session


Additional Resources:

Blackboard Collaborate provides a default online course room for your courses that stays open for the life of the course. Also, new sessions can be created (see separate section for Schedule a New Collaborate Session).

Access Collaborate Ultra

  1. Go to the Course Content page
  2. Click the drop-down next to the Blackboard Collaborate Join Session link
  3. Choose a session to join
  • Course Room is the default session to join.
  • Any other sessions created for the course will show in the list of sessions.

Enter a Collaborate Session

The first time using Collaborate will prompt a message to access your camera and microphone.  Click Yes. 

Collaborate Session Menu

In the upper left corner, you will find the session menu.

  1. Start recording a session (moderators only)
  2. Use the phone for audio
  3. Click X to close the window
  4. Stop recording (moderators only)

If students are working in a session and need to record, they will need to set up as a moderator (see Schedule a Collaborate Session)

Recordings

It takes time for your recording to render and be available to access and share.  You can have multiple recordings saved during one session.

To find your recordings, click on Collaborate session menu>Recordings.


Tools Available to Moderators and Students

  1. Profile:  Access My Settings, set away status, and leave the session
  2. Audio: turn on and off
  3. Video: turn on and off
  4. Raise your hand: turn on and off

Collaborate Panel

In the lower right corner, find the Collaborate panel.  (See Moderate a Session section for more detailed instructions for moderating)

  1. Chat with participants
  2. Attendees panel
  3. Share Content (See Moderate a Session section)
  4. Settings
  5. Close the panel

Grant students "moderator" status to share their screen or upload a file.

  • Go to the Attendees panel.
  • Click on the student's more options next to their name and change the student's permission. 

Additional Resources:

Additional Resources:

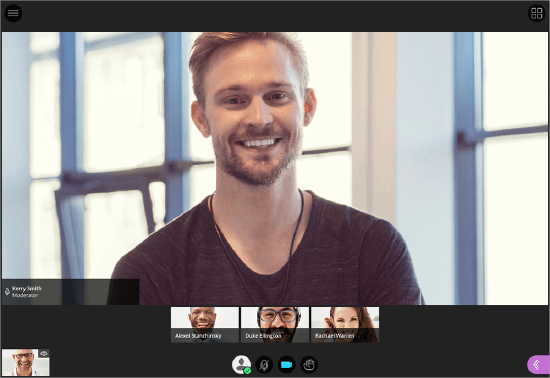
As an instructor, you have many tools to moderate a Collaborate session.

Collaborate Panel

You can access the presenter controls by clicking on the purple arrow in the lower left-hand corner of the screen.

The Collaborate Panel has many options to moderate a Collaborate session

  1. Chat with participants
  2. Attendees panel
  3. Share Content
  4. Settings
  5. Close Collaborate panel

Using Chat

  • To enable/disable global chat permissions:
    • Access Collaborate Panel>Session Settings   
    • Mark/unmark the Post chat messages permission
  • Scroll chat panel to read messages.
  • Messages entered by a Moderator display with a blue box, while participants appear in a gray box
  • Send public messages to everyone or private messages to individual attendees.

Using the Attendees Panel

The attendees' panel allows you to adjust and view attendees' status in the session.  You can view in this panel:

  • Raised hands
  • Attendee has stepped away
  • Attendee speaking
  • Attendees promoted to presenter
  • Attendees connection status

Managing Attendee Status

  • Click on more options next to an attendee's name to change their status
    • Moderators have full control of the content being shared
    • Presenters can upload, share, and annotate content
    • Participants have the enable/disable microphone or camera and can chat posts
    • View an attendees' connectivity status

Sharing Content

There are several opportunities for sharing content:

  • Share your screen
  • Start a whiteboard
  • Share saved files
  • Start a poll
  • Start a timer
  • Create Breakout Groups


Settings

There are three settings sections.  As a moderator, you may choose to disable or enable permissions at the global level.

  • Adjust audio/Video
  • Set notification settings
  • Adjust Session Settings

Additional Resources:

iTLC:
Email
FAQ
Text
Chat

iTLC:
Email
FAQ
Text
Chat